What is bank reconciliation?
Bank reconciliation is the process of comparing your bank statement against your internal accounting records to make sure they agree. The bank says you have a certain balance; your books say you have a certain balance. Bank reconciliation explains the difference.
The differences typically fall into predictable categories: outstanding checks (you wrote them but they have not cleared the bank yet), deposits in transit (you recorded them but the bank has not credited them yet), bank fees, interest income, and errors on either side.
Every business needs to reconcile its bank accounts — it is one of the most fundamental internal controls in accounting. Monthly reconciliation catches errors before they compound, prevents fraud, and ensures your financial statements are accurate.
Why do bank reconciliation in Excel?
Many businesses do bank reconciliation in Excel because it is where their data already lives. Bank statements can be downloaded as CSV files. Accounting software exports to Excel. For small to mid-size businesses, Excel is the natural environment — no additional software to learn, no data to migrate, no IT department to involve.
Enterprise reconciliation platforms like BlackLine and Trintech cost $20,000-$100,000+ per year and require months of implementation. For businesses processing a few hundred to a few thousand transactions per month, Excel with an automated reconciliation add-in is the practical choice.
For a detailed comparison, see Power Reconcile vs BlackLine.
Step 1: Gather your bank statement and internal records
Start by getting both data sets into Excel:
- Bank statement: Log into your bank's online portal and download the statement for the reconciliation period. Most banks offer CSV, Excel (XLS/XLSX), QFX, or OFX formats. CSV and Excel are the easiest to work with. If your bank only provides PDF statements, use a PDF-to-Excel converter first.
- Internal records: Export your cash account transactions from your accounting software (QuickBooks, Xero, Sage, NetSuite, SAP, or any ERP) for the same period. Export to Excel or CSV format.
Open both files in the same Excel workbook — put the bank statement on one worksheet and the ledger on another.
Tip: Make sure the date ranges match. If your bank statement covers June 1-30, export your ledger transactions for the same dates. Mismatched periods are the most common source of "false" discrepancies.
Step 2: Format and clean both data sets
Before you start matching, take a few minutes to clean up your data. This step prevents false mismatches caused by formatting issues:
- Check for header rows. Both sheets need headers (Date, Reference, Description, Amount, etc.). If your bank export does not have headers, add them.
- Convert amounts to numbers. CSV imports often store amounts as text. Select the amount column, check if Excel shows a green triangle (number stored as text), and convert. You can also use a formula:
=VALUE(SUBSTITUTE(SUBSTITUTE(A2, "$", ""), ",", "")) - Handle debit/credit conventions. Some bank statements show debits as negative numbers and credits as positive. Your ledger might use two separate columns (debit and credit). Make sure the sign convention is consistent — or that you know which direction each system uses.
- Identify your reference column. This is the field that exists in both data sets and uniquely identifies each transaction: check number, transaction reference, wire transfer ID, or any consistent identifier.
- Remove blank rows and subtotals. Bank exports sometimes include summary rows, section headers, or blank lines. Remove anything that is not a transaction.
Step 3: Match transactions (manual method)
The manual method uses VLOOKUP to find each bank transaction in your ledger:
Look up each bank transaction in the ledger
On the bank statement sheet, add a new column. In the first data row, enter:
=IFERROR(VLOOKUP(B2, Ledger!A:D, 3, FALSE), "NOT FOUND")
Replace B2 with your reference cell, Ledger! with your ledger sheet name, and adjust the column index (3) to return the amount column. Copy this formula down for every row.
Calculate differences
Add another column to show the difference:
=IF(E2="NOT FOUND", "Unmatched", D2 - E2)
Zero means the amounts match. Any other value is the discrepancy. "Unmatched" means the transaction exists in the bank statement but not in your ledger.
Check the other direction
Repeat the process on the ledger sheet, looking up each ledger transaction in the bank statement. This catches transactions that are in your books but not on the bank statement — typically outstanding checks and deposits in transit.
Warning: VLOOKUP returns the first match only. If check #5001 appears twice in your ledger (maybe you voided and re-issued it), VLOOKUP matches the first one every time — the second is silently ignored. This is a critical limitation for bank reconciliation.
Step 3 (alternative): Match transactions with Power Reconcile
Instead of building VLOOKUP formulas, you can use Power Reconcile to automate the entire matching process:
- Open the Power Reconcile panel in Excel and select your bank statement range as Table A.
- Select your ledger range as Table B.
- Choose the reference column (check number, transaction ID) and amount column for each table.
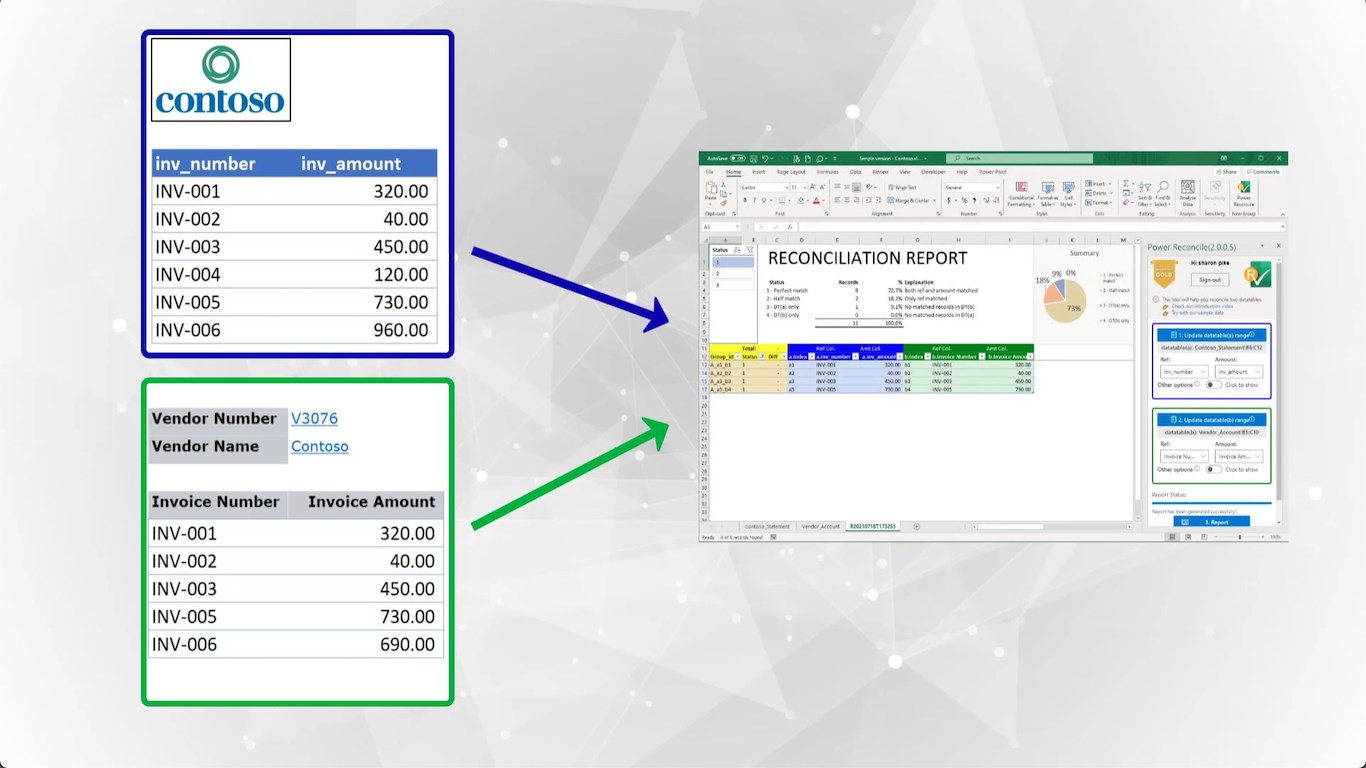
- Click "Generate Report." Power Reconcile automatically matches every transaction using one-to-one matching (handling duplicates correctly) and generates a report in a new worksheet.
The report categorizes every transaction into four groups: perfect matches, value differences (with exact amounts), items only on the bank statement, and items only in the ledger. This is your reconciliation — the items in the last two categories are your reconciling items.
A typical month-end bank reconciliation with 2,000+ transactions takes under a minute with Power Reconcile vs. 30-60 minutes manually.
Step 4: Identify and categorize reconciling items
After matching, you will have a list of unmatched and partially matched items. Categorize each one:
Outstanding checks
Checks you have written and recorded in your ledger, but that have not cleared the bank yet. These appear as "only in ledger" in the reconciliation report. They will clear in the next period — verify by comparing against the prior month's outstanding check list.
Deposits in transit
Deposits you have recorded but the bank has not credited yet (common for deposits made on the last business day of the month). These also appear as "only in ledger." Verify they appear on the next month's bank statement.
Bank fees and charges
Service charges, wire transfer fees, NSF fees, and other bank charges appear on the bank statement but not in your ledger (because you did not know about them until you received the statement). These appear as "only on bank statement." You need to record journal entries for these.
Interest income
Interest credited by the bank that you have not yet recorded. Same treatment as bank fees — record a journal entry to bring your books up to date.
Errors
Items that appear as value differences (matched on reference but different amounts) are usually errors — a transposed digit, a missing decimal point, or a posted amount that differs from the actual transaction. Investigate each one, determine which side is correct, and make the appropriate correction.
Step 5: Handle split transactions and combined deposits
Not every transaction matches one-to-one. Common exceptions include:
- Combined deposits: You recorded three separate customer payments ($500, $750, $1,200), but the bank shows one deposit of $2,450. Your ledger has three line items; the bank has one.
- Split payments: You issued one check for $5,000, but the vendor deposited it in two batches ($3,000 and $2,000). Your ledger has one line item; the bank has two.
- Netting: A vendor issues a credit for $200 and charges $1,500, and the bank shows a net payment of $1,300.
These exceptions cannot be handled by VLOOKUP or any formula-based method. In Power Reconcile, use the Manual Reconciliation dialog to select multiple rows from one side and match them against rows on the other side. The tool verifies that the amounts balance before confirming the match.
If you are reconciling manually, document these matches in a separate section of your reconciliation — note the line items from each side and confirm the amounts net to zero.
Step 6: Record adjustments in your books
After categorizing all reconciling items, record the necessary adjustments:
- Bank fees: Debit Bank Charges expense, credit Cash account.
- Interest income: Debit Cash account, credit Interest Income.
- Errors found: Correct the original entry or post an adjusting entry.
- NSF checks: Reverse the original deposit entry and reinstate the receivable.
Outstanding checks and deposits in transit do not require adjustments — they are timing differences that will resolve in the next period.
Step 7: Verify the adjusted balance
The final step is to verify that your adjusted balances agree:
| Bank Side | Book Side |
|---|---|
| Bank statement ending balance | Ledger ending balance |
| + Deposits in transit | + Interest income |
| − Outstanding checks | − Bank fees / charges |
| ± Bank errors | ± Book errors / NSF |
| = Adjusted bank balance | = Adjusted book balance |
The adjusted bank balance and adjusted book balance must be equal. If they do not match, there is a remaining discrepancy to investigate — go back through the unmatched items and verify categorization.
Real-world example: month-end bank reconciliation
A regional housing development corporation processes hundreds of transactions monthly across multiple bank accounts — vendor payments, government funding deposits, contractor invoices, and tenant receipts. Their controller downloads BMO and CIBC statements as CSV files and exports the general ledger from their accounting system.
Before Power Reconcile: The team spent 2-3 hours per bank account using VLOOKUP formulas and manual scanning. Combined deposits (multiple tenant payments batched into single bank deposits) were the biggest headache — VLOOKUP could not group them, so the team had to match them by hand, often comparing printed statements side by side.
After Power Reconcile: Each bank account reconciliation takes 5-10 minutes. The automatic matching handles 90% of transactions instantly. For combined deposits and split payments, the controller uses the manual reconciliation dialog to group items and verify the amounts balance. Month-end close that used to take a full day of reconciliation now takes about an hour.
Bank reconciliation best practices
- Reconcile monthly, at minimum. Do not let bank reconciliation fall behind. Unreconciled months stack up, making discrepancies harder to find and resolve.
- Start from the prior month's reconciliation. Last month's outstanding checks and deposits in transit should clear this month. If they don't, investigate — a check outstanding for 90+ days may need to be voided.
- Separate the person who reconciles from the person who records. Segregation of duties is a basic internal control. The person reconciling the bank should not be the same person recording transactions.
- Keep your reconciliation files. Save each month's reconciliation report for audit purposes. If you use Power Reconcile, the report is generated in a new worksheet you can save with the workbook.
- Investigate stale outstanding items. An outstanding check older than 6 months may need to be voided and re-issued. A deposit in transit for more than a few days needs immediate investigation.
- Automate what you repeat. If you reconcile the same bank accounts every month, the time savings of an automated tool compound quickly. Power Reconcile's "Refresh Reconciliation" feature lets you re-run matching on updated data without reconfiguring.
Common bank reconciliation mistakes to avoid
- Forcing the reconciliation to balance. If there is a difference, find it. Do not create a "reconciliation adjustment" to force the numbers to match. This masks real problems.
- Forgetting to check both directions. Looking up bank transactions in the ledger only finds items missing from the ledger. You must also look up ledger transactions in the bank statement to find outstanding checks and deposits in transit.
- Ignoring small differences. A $0.50 difference might be a rounding issue — or it might be the first sign of a systematic problem. Investigate every difference, no matter how small.
- Not recording bank fees promptly. Bank charges discovered during reconciliation need journal entries. If you defer them, next month's reconciliation starts with a known discrepancy.
- Mismatched date ranges. Your bank statement period and your ledger export period must match exactly. A one-day difference can create dozens of false discrepancies.
Manual vs. automated: which approach is right for you?
- Under 100 transactions/month, single bank account: Manual VLOOKUP is workable. You will spend 15-30 minutes per reconciliation.
- 100-500 transactions, or multiple bank accounts: Power Reconcile saves significant time. Each reconciliation takes under a minute instead of 30-60 minutes.
- 500+ transactions, or complex matching needs: Automated reconciliation is essential. Manual methods become error-prone at this scale, and the time investment is substantial.
- Enterprise (10,000+ transactions, multiple entities): Power Reconcile handles the matching; for multi-entity consolidation, consider enterprise features. Contact support@power-reconcile.tech for volume pricing.